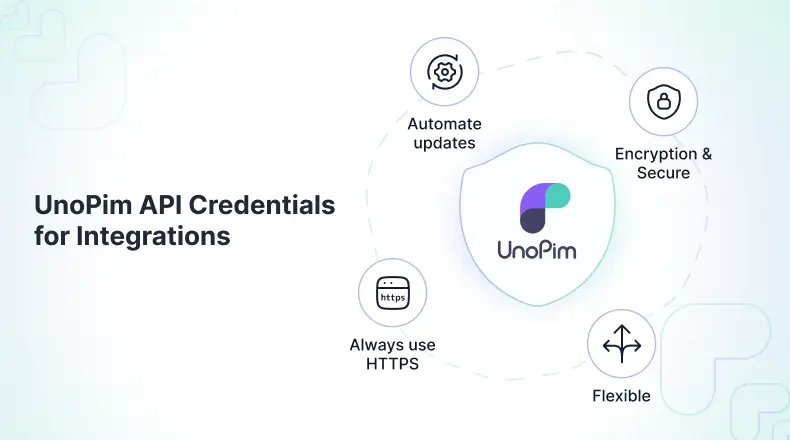
It consists of a Client ID and Client Secret (unique keys that identify and authenticate the connection).
They are linked to a specific User, so activity is trackable and controlled.
Include permission settings (All or Custom) , ensuring only the right data is shared.
This makes the credentials both secure and flexible, allowing smooth integration with any platform.
Why API Credentials Matter in PIM
Without APIs, teams would have to export and import data between platforms manually. That means wasted time, errors, and duplicate work. With API credentials, you can:
Automate updates across channels.
Securely control who gets access to product data.
Scale faster, whether you manage hundreds or thousands of SKUs.
Step-by-Step Guide to Creating API Credentials in UnoPim
Follow these steps to create secure API credentials in the PIM and connect your systems safely.
1. Log in to UnoPim Admin.
Make sure you have an account with enough privileges (Admin or similar) to create integrations/API keys.
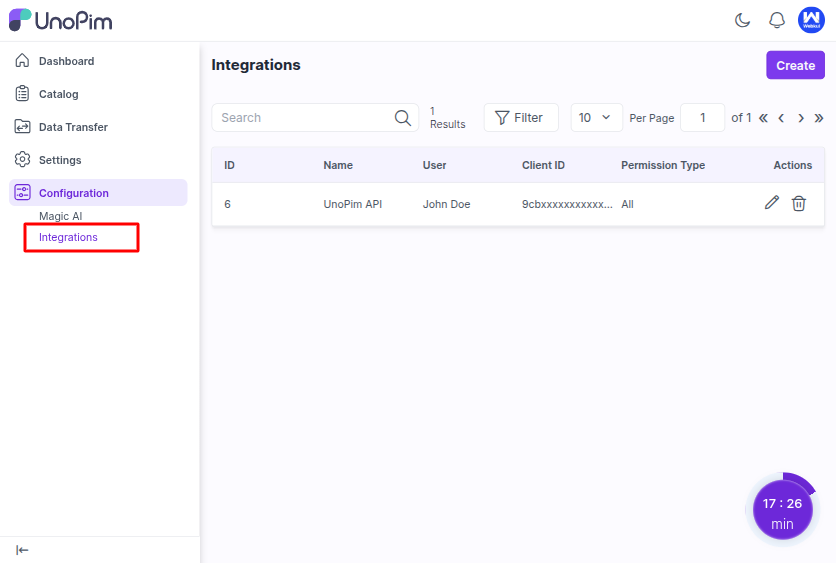
2. Navigate to the Integrations Section.
Go to Configuration → Integrations. This is where system manages API Keys/credentials.
3. Click on ‘Create’ to create a New API Credential.
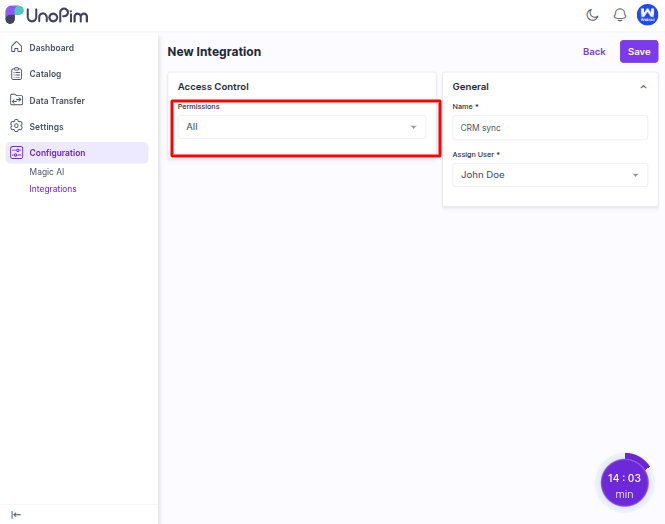
4. General Details
Name: Provide a descriptive name for the integration (for example: ERP Sync, WooCommerce Connector, or Mobile App) so you can easily identify it later.
Assign User: Select a user from the ‘Assign User’ dropdown. All API activity will be tied to this user (for audit, traceability).
5. Access Control / Permissions
Choose All if the integration needs full access across settings, catalog, channels, etc.
Choose Custom to restrict: after selecting Custom, you will get checkboxes to grant specific permissions, like: catalog permissions (view, create, update, delete), settings permissions, channel access, etc. This is good for least‐privilege security.
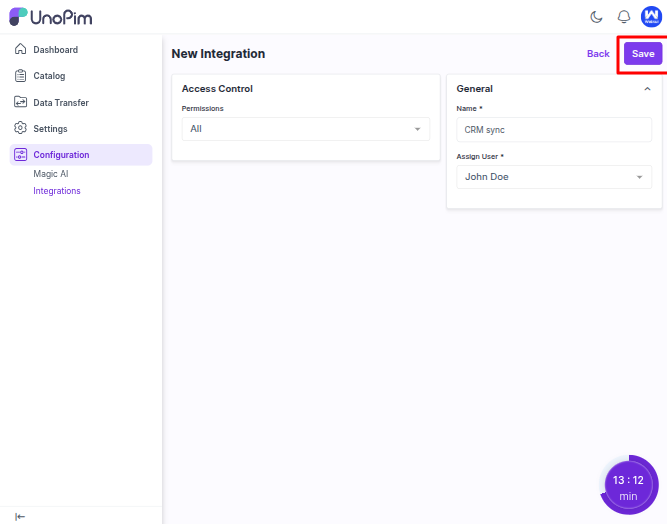
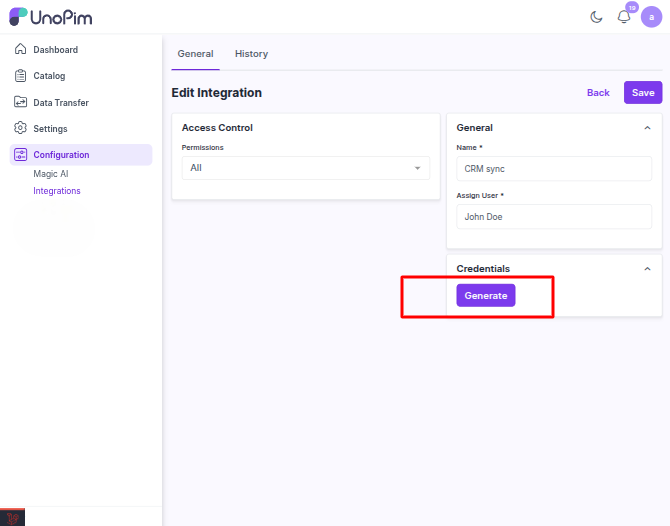
6. Save the Integration / Credential.
Once name, user, and permissions are all set, click Save. At this stage, the system registers the integration but doesn’t yet show you the secret key.
You will not see the Client ID/Secret immediately, you must first save, and then explicitly click Generate Secret Key in the next step to reveal them.
7. Generate Secret Key
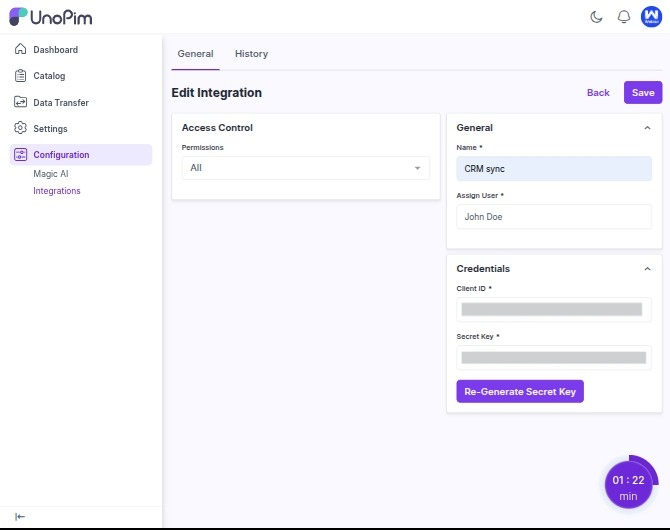
After saving, a Generate Secret Key button will appear. Click it to reveal the Client ID and Client Secret. These are the credentials you will use for authenticating API requests.
8. Store the Credentials Safely
Treat the Client Secret like a password: don’t expose it in public code, repositories, or emails. The Client ID is less sensitive but still important to keep tied to the right integration.
9. Re‐Generate Secret Key (When Needed)
If you suspect your secret key is exposed, click Re-Generate Secret Key to invalidate the old one and generate a new key.The platform will keep the same Client ID, but the old secret will no longer work.
Important: Please update all systems using the old secret key. Otherwise their API calls will fail.
10. Take Note of the Permissions / Scope, and Test.
Double-check the permissions you assign and ensure they match your integration’s needs. For example, if the integration updates product stock, include product update permissions.
How to Test Your API Credentials Using Postman
Postman is a great way to test your UnoPim API credentials without writing any code. It is perfect for quickly checking if your credentials work, exploring endpoints, and seeing product data immediately.
UnoPim provides a ready-to-use Postman collection and environment, so you can start testing right away:
Collection: Contains the API requests.
Environment: Contains placeholders for your credentials (Client ID, Secret, URL, username, password).
From UnoPim Dev Docs, download the Postman Collection and Environment files.
Collection: Pre-configured requests like “Get API Authentication” and “Get Products”
Environment: Placeholders for credentials.
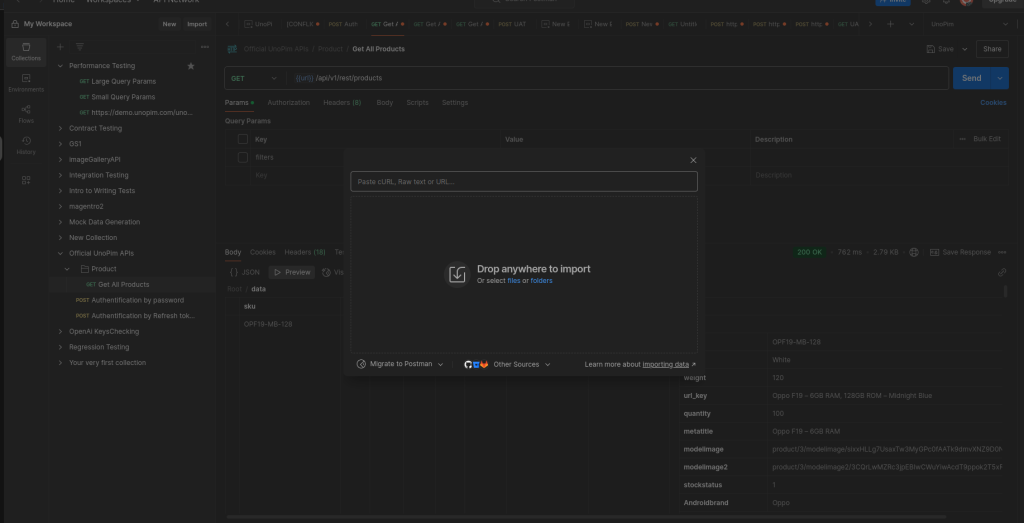
3: Import Collection and Environment
Open Postman → click Import → Upload Files.
Select the UnoPim Collection and Environment you just downloaded.
Postman will load all the predefined requests and environment variables.
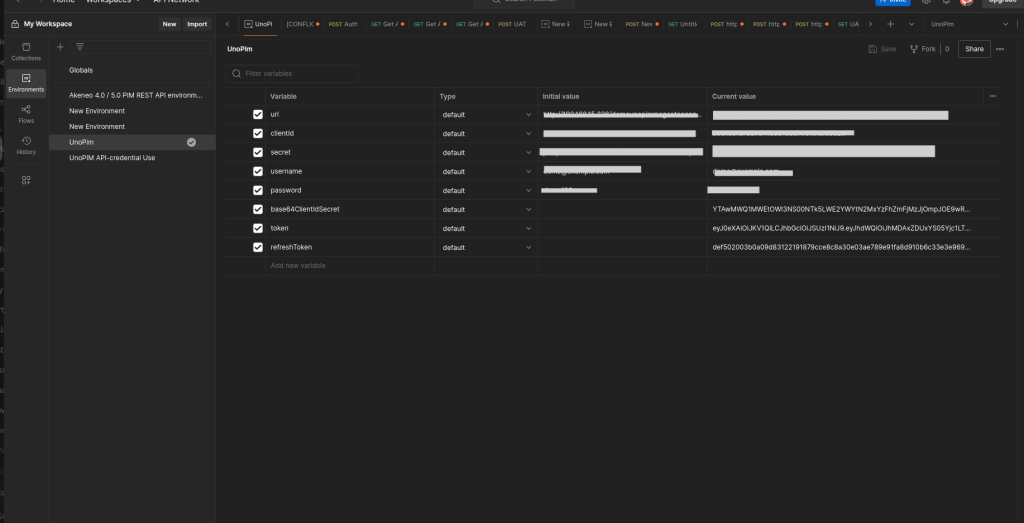
4: Set Environment Variables
Update the following variables with your own credentials:
Environment Variables to Set in Postman:
username → Your UnoPim user email
password → The password of the UnoPim user assigned to the API credential
clientId → The Client ID generated for the API credential in UnoPim
secret → The Client Secret generated for the API credential in UnoPim
url → The base URL of your UnoPim instance (e.g., https://your-unopim-url)
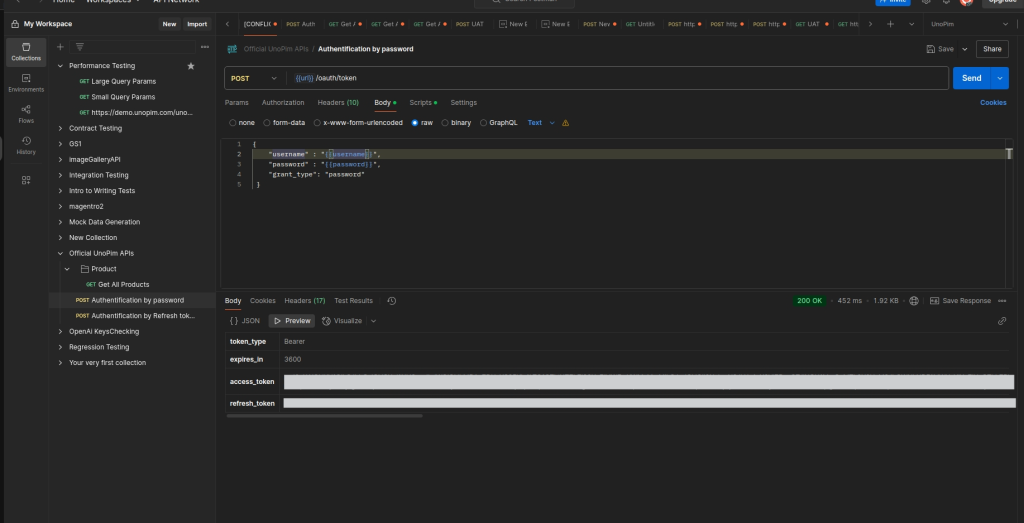
Step 5: Get Access Token (Using UnoPim Collection Request)
The UnoPim Postman Collection already includes a ready-to-use request called “Post Authentication By Password”.
This request uses the password grant type, so you don’t need to manually create a POST request.
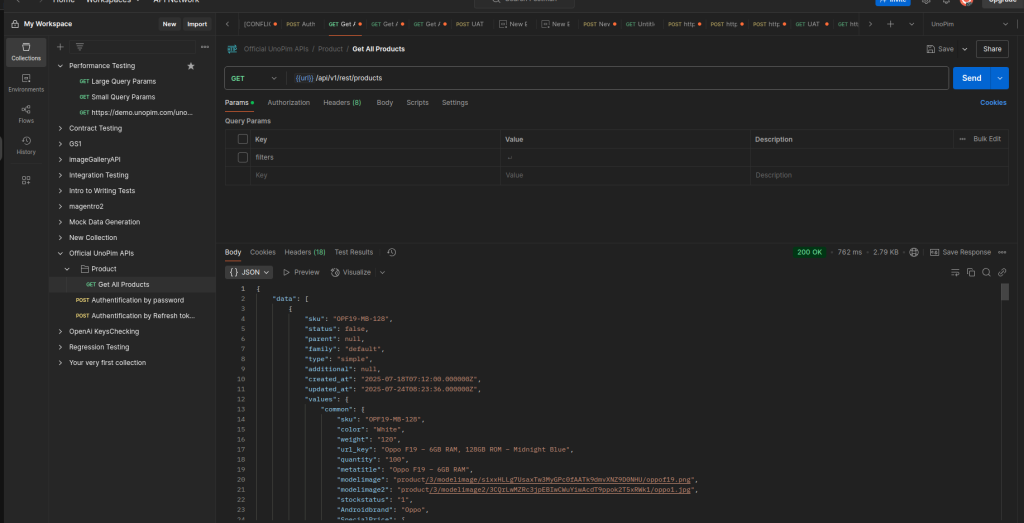
Step 6: Fetch Products from UnoPim
Open the Get All Products request in the imported UnoPim Postman Collection.
Ensure the Authorization header is set to Bearer {{token}} (the token obtained in Step 5).
Click Send.
You should see a JSON response listing all your products values with its all fields.
7. Why Testing API Credentials Matters
Easy for non-developers to validate credentials without coding.
Visualizes responses in JSON for verification.
Reusable setup saves time for multiple requests.
Confirms permissions and connectivity before using the credentials in scripts or applications.
Practical Example: How API Credentials Simplify Multi-System Data Management
The Problem
Managing a central product catalog across multiple channels can be challenging:
You sell on several eCommerce platforms (Shopify, WooCommerce, Magento, etc.)
Your ERP or CRM systems (Zoho, Odoo, SAP, etc.) also need the same product information
Updating each platform manually leads to errors, inconsistencies, and wasted time
Even though UnoPim provides built-in connectors for some eCommerce stores, ERP and CRM systems often require separate updates, which is time-consuming.
The Solution: Use UnoPim API Credentials for Integration
Create an integration in UnoPim, for example: “Catalog ↔ ERP/CRM Sync” Assign custom permissions so only the necessary data is shared.
Connect your ERP/CRM systems using the generated API credentials:
ERP pulls catalog data from UnoPim (e.g., prices, stock, currencies, locales)
ERP pushes updates back to UnoPim (e.g., stock changes, price adjustments)
CRM receives the latest product information for accurate sales and marketing
Note: The API credentials act as a secure bridge between UnoPim and any third-party platform—no manual data entry is needed.
The Result
One source of truth: Prices, stock, and product details are updated in UnoPim once and flow to all connected systems automatically.
Consistent data: ERP, CRM, and eCommerce stores always have the latest information.
No duplication or errors: Manual updates are eliminated, saving time and preventing mistakes.
Scalable: Works for hundreds or thousands of SKUs and multiple platforms simultaneously.
Security Best Practices
Use limited permissions: grant access only to the data needed.
Rotate credentials regularly: reduces risk if credentials are exposed. A good practice is every 3–6 months, or immediately after you suspect a key has been exposed.”
Always use HTTPS: ensures data is encrypted in transit.
Keep Client Secret private: never share it in public code or emails.
Why This Strengthens the PIM
Simple to use — credentials in just a few clicks.
Flexible — works with eCommerce, ERP, CRM, or custom apps.
Scalable — handles both small catalogs and enterprise-level integrations.
Secure — user assignment ensures controlled access and audit trails.
By adding secure API credentials to its existing capabilities, This Platform strengthens its position as a complete PIM(Product Information Management) solution for modern digital businesses.
Conclusion
Generating API credentials isn’t just a technical detail. It’s the key to connecting your PIM with the rest of your business ecosystem. Whether you are syncing products to an online store, linking ERP systems, or building custom integrations, The platform makes it simple, secure, and scalable.
Try it today, Log into UnoPim, create your first integration, and experience the difference seamless connectivity makes.
Hope this helps you out! If you run into any problems, don’t hesitate to submit a ticket at our Support Portal.